
A case study with The DevRel Salon
Are you looking to get into livestreaming? Are you wanting to do something collaborative, like pair programming or running an unconference-style meetup? Understanding the tooling for collaborative livestreaming can be daunting.
Read on to learn about the tooling I use to run The DevRel Salon, a live collaborative conversation among developer relations professionals.
Tl;dr
- You don’t need a specialized or dedicated computer for this kind of livestreaming, use what you already have
- Use the webcam you have, video resolution doesn’t actually matter much
- If you have a DSLR or mirrorless camera, check to see if the manufacturer has made a webcam driver available
- Consider purchasing a dynamic (as opposed to condenser) USB microphone, audio quality does matter
- Use Streamyard to produce your stream, it is an easy-to-use turnkey solution for both general production and handling guests
- Use CoScreen for live collaboration with your guests
- Use Twitch to broadcast your livestream to your audience
- Be sure to set up the moderation options
- Have fun with it, if you’re stressed out or not having fun, your viewers will notice. Set yourself up for success by keeping things as simple as possible
Howdy, I’m Don! I’m a systems and backend engineer, and a developer relations expert. I was once an engineer at Screenhero, but over the years I moved into developer advocacy at places like Slack and GitHub, where I helped other engineers get the most out of those platforms.
For the past few years, I’ve helped organize and run a The DevRel Salon, an international meetup for developer relations professionals. But rather than the usual format of having invited speakers lecture an audience, our focus has been on creating a collaborative learning experience by fostering conversations among peers. Our goal is to create a welcoming space for both seasoned and novice developer relations professionals to share their stories and experiences without trying to dictate topics or reinforce hierarchies.
To do this, we use a simplified [Open Space Technology] format. Participants arrive at the specified time and location, usually a café with a comfortable terrace, or a host organization’s office. To encourage conversation, we might suggest a topic, or invite someone with a unique experience to share. The guests then break off into one or more conversation groups. Crucially, to help spread the conversation beyond just those present, we assign a note-taker to each group to capture the details of the conversation (respecting the privacy of those present, of course).
But in the era of COVID, such gatherings are not possible. After nearly a year of dormancy, we have started experimenting with a new format: Livestreaming. But it was really important to us that we capture what made the in-person events so compelling, the inclusive interactivity. We couldn’t just put some talking heads on the screen, and let the collaboration play out in the stream chat—we tried that, and it failed. We needed to create a more collaborative environment.
Here is a short primer on what worked for us: The equipment, software, and processes that we settled on for our experiment in collaborative livestreaming.
Overall Structure
The way we structure the DevRel Salon livestream is not so different from other livestreams. We pick two hosts to facilitate the conversation, to keep it going, and help guide it in useful ways. They’re the people you see on the screen at the stream’s start. Additionally, we have a producer running the show, moderating the chat, inviting guests into the live conversation, and generally keeping things moving smoothly, although one of the hosts could also play this role. Finally, the producer is working with a dedicated note-taker to keep track of the conversation in a shared markdown document. Then we invite folks from the Twitch chat into the livestream to share their expertise and opinions. The conversations seem to last a bit over an hour before it plays out.
Computers
Of course everyone involved will need a computer. Your hosts and guests don’t need anything special, they can even use a smartphone to join the stream. But the producer’s computer is where all the audio and video come together to be encoded into a single stream. The producer will need a solid internet connection, and a computer capable of keeping up with the encoding demands, but it’s not so bad as you might think. We stream at 720p and I find that my 2017 15” MacBook Pro is more than enough machine to keep up with the demands, although the fans do come on.

Camera
Opinions differ about the need for serious webcam and microphone hardware. Between more people working from home, and a computer chip shortage, most popular items have become more difficult to find online.
Believe it or not, the webcam you already have is probably fine. The reason is that the entire video stream will be encoded into 720p or possibly 1080p, but your webcam’s video will only be a portion—possibly a very small portion—of the entire screen. I have an 8-year-old Microsoft LifeCam Pro that I used until recently with no trouble.
If you have a DSLR or mirrorless camera, many camera manufacturers have recently released drivers that allow you to use their products as webcams as well.
The more light you have, the better your webcam’s image will be. So I strongly recommend using a keylight. I have an inexpensive pair from Neewer—the build quality is awful, but they do put out a lot of light, which is the important bit. But there’s no need to spend money if you have an adjustable desklamp that you can shine into your face! You’d be surprised how effective that can be for improving the picture quality on nearly any webcam.
If you’re on a Mac and using an older USB webcam, [Webcam Settings] is an invaluable tool for extracting the best possible image quality, allowing you to tweak the exposure settings manually to make the best use of whatever light you have available.
Microphone
While the human eye can tolerate a low quality image, low quality sound can make understanding you very difficult. And, while there are inexpensive things you can do to improve your image quality, there’s almost no way to improve the audio quality from a cheap microphone. My home office is very noisy, it’s full of echos because it has a very high peaked roof. For that reason, the built-in microphones in my laptop and my webcam make me sound like I’m in the back of a cave, almost unintelligible.
Buying a dedicated microphone is the one place I strongly recommend you invest a little money. There are a variety of microphones targeted at podcasters that are perfectly suited for livestreaming as well. Most podcasting microphones come with a USB connector, instead of the old fashioned analog XLR connector; You should get one that provides USB output. Setting it up is usually just a matter of plugging it in. There is no advantage to be had in buying a microphone with an XLR output.
There are two different microphone types you should be aware of: Condenser and dynamic.
Condenser microphones are very sensitive, capable of capturing every nuance in your voice. This makes them the microphone of choice for recording studios, and are the most common kind of podcast microphone on the market. However, for these very reasons, they are terrible in less than ideal environments, as they will faithfully capture every bit of noise and echo at your desk. So, unless you have an acoustically tuned recording studio, I don’t recommend these. Unfortunately, most podcasting microphones are condensers.
Dynamic microphones are less sensitive, and are usually used for live performances on stage where there’s a lot of noise. For this reason, they also make great microphones for home offices or otherwise noisy or echo-y environments. The down side is that you have to bring them quite close to your mouth, so it will be visible in the video feed. I use a Røde Podcaster USB microphone: it gives my voice a warm, rich tone, and totally ignores all the echo and noise in my office.
Streaming service
Twitch is the de facto standard, and it’s where most people look to find a livestream. But it can be hard to understand, because its UI is frankly terrible. Once you sign up (it’s free), you’ll need to make a few changes to the settings.
The first is to enable disconnect protection. If you lose your connection in the middle of a stream, with this enabled, Twitch throws up a “technical difficulties” screen to let your audience know there is a problem, instead of just dropping the stream entirely. You can find it on your dashboard at:

The second thing is to turn on the automatic moderation. You never know who might show up in your chat and start causing problems. AutoMod scans your chat, and holds questionable comments for moderation. Here are the settings I chose for The DevRel Salon, but of course you can change these whenever.

Finally, to keep trolls out of your livestream chat, you can turn on email verification. Normally, literally anyone can show up in your chat anonymously, but by enabling this feature, anyone wanting to participate must have a valid email address, thus creating a small barrier to entry that will keep most trolls away.

Finally, maintaining a schedule is important, because viewers like predictability. Decide when to air your first livestream, and set it up in the Twitch show calendar:

Don’t forget to share your upcoming show with your network!
Livestreaming software
OK, you have Twitch set up, but how do you get your webcam (and your other guests’ webcams! And the show notes!) into Twitch? You need production software. Production software takes all the various video and audio feeds, combines them in a visually pleasing way, and ships them off to Twitch in real time.
You may have heard of OBS, as it is the gold standard for livestream production. It can literally do anything you want it to…but as you can imagine, the learning curve for accomplishing even the simplest of tasks is extremely high. For this reason, I don’t recommend starting with OBS.
Instead, I recommend Streamyard. [Streamyard] is not nearly as flexible as OBS, but it provides a set of simple features that automate the most common livestreaming processes. Streamyard makes it easy to invite guests, share a window or a screen, and to manage the overall layout of the different video elements. Customizing with your own branding is a matter of uploading a few images. It funnels conversations from Twitch and other streaming destinations into a single chat pane, and you can highlight individual comments on the screen. OBS requires a fairly advanced understanding to do these things.
That said, access to all of these features in Streamyard costs money, where OBS is free, but costs time and stress to get over the learning curves and create the screen layouts and motion effects in Streamyard.
Streamyard can take your produced stream and send it to a number of locations. To set it up to send the stream to Twitch, visit:

It’s worth noting as well that if you don’t want to stream your session live, StreamYard has an option to simply record your session, for you to share on YouTube later. When you create a new broadcast studio, you’ll be presented with that option. Alternatively you can use a dedicated recording tool like getwelder.com or riverside.fm to make the recording instead of Twitch + Streamyard.
Collaboration software
Finally, if you are doing on-screen collaboration, you need a way to share access to your work! Although both Streamyard and OBS allow you to share a window into the livestream, neither offers any kind of interactivity with guests. So we need one more piece of software. There are two primary contenders in this space: VS Code Live Share and CoScreen.
[VS Code Live Share] is at the moment the most popular option, as many developers already know and use VS Code. If you and your guest are only working on text files (like source code), and are both already comfortable with VS Code, then it’s a great option that’s easy to get started with. But outside of that limited scope, VS Code Live Share is less appealing, particularly if you prefer a different IDE like Xcode, Eclipse, or JetBrains. VS Code Live Share also doesn’t work if you want to collaborate on something that is not pure text, like a web page rendered in a browser, or graphic or UI design, or UI design.
[CoScreen] is a new option that makes collaboration feel more natural. A spiritual successor to Screenhero, CoScreen allows you and your guests to share windows from your individual desktops to more naturally recreate the experience of working together on the same computer. It lets you use the tools you’re already familiar with, and invites more interactive collaboration. CoScreen is the best option when you want to go beyond text editing, for example, to share a web browser to preview or test a web app, or work together on UI design for an iPhone app in Xcode.
Naturally, I recommend CoScreen for its flexibility. Make sure you and any guests have [downloaded CoScreen] and created an account. CoScreen uses the concept of a shared room for collaboration, called appropriately enough “CoScreens”.
Make sure you have one created for the livestream, and that all your guests have the URL to join it. Click the “New CoScreen” button in the CoScreen dashboard to make that happen.

Go time
Now, how do you put all these pieces together?
1. Create a new broadcast in Streamyard
https://streamyard.com/broadcasts
And clicking “Create a broadcast”. Choose Twitch from the list of sources, or if you want to only record your session for sharing later you can choose “Skip, Record only”.

2. Once you’re in the studio, make sure your camera and mic work. Invite your guest using the “Invite” button at the bottom:

3. Set up your share collaboration space. For the DevRel Salon, we use a markdown file to record notes from the conversation; I pull up a new file in Sublime Text, and use CoScreen to share that window with the note-taker so we can work on it together during the show.
Open the application you’re going to work on together, and click the “Share Window” tab that CoScreen places above the foreground window.

This will add the window into the share workspace.
4. Then I share the Sublime Text window into the stream with Streamyard using the “Share” button at the bottom of the Streamyard window.

5. Make sure to add yourself, your guest or guests, and the shared window into the stream, by hovering over each thumbnail, and clicking “Add to stream”:

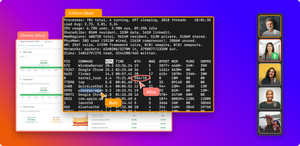
The results should look something like this:

We’ve got the guests on the left, and the document we’re collaborating on via CoScreen on the right.
6. Although Streamyard handles all the chat really transparently, it doesn’t expose Twitch’s moderation tools. So you’ll have to open the Twitch moderation dashboard in a separate window:
https://www.twitch.tv/moderator/YOUR_CHANNEL_NAME
7. When everything is in place, just hit “Stream”! Once the session is over, you’ll be able to grab a recording of the session from Twitch (if you streamed it) or Streamyard (if you chose “Record only”). In Twitch, visit:
https://dashboard.twitch.tv/u/YOUR_CHANNEL_NAME/content/video-producer
To get a list of all livestreams ready to download. Don’t forget that Twitch only holds your recordings for two weeks!

Results
See for yourself!
https://www.youtube.com/channel/UCEarXTdyKBSbTwJaPtMBZyQ
Took about two hours to set up, most of that was creating the branded graphics for Streamyard, and figuring out the configuration options on Twitch. I’m confident you’ll be ready to do some live collaboration yourself in no time.